Monday, January 30, 2012

Creamy Chicken Marsala


   Have I ever mentioned my love of Italian food? I could eat it everyday. There has actually been a couple of times in the past I've prepared an Italian dish almost every night of the week without realizing it until Brian said, "Are we having Italian again tonight?"  This recipe is a nice change of pace from your average American Italian dish because it doesn't contain tomatoes and it goes really nicely with mashed potatoes instead of pasta. I even substituted bacon for the pancetta because that's what I had on hand and I felt like being a little rebellious.


Creamy Chicken Marsala
   From Simply Recipes

Olive oil
2 oz pancetta (I used 3 slices bacon) cut into 1/4in cubes
1/2 medium onion, diced 
Flour for dredging
1 lb chicken cutlets
3/4 cup dry Marsala wine
6 Tbsp heavy cream
Salt&pepper
Minced fresh flat-leaf parsley


Coat pan lightly with olive oil and heat on medium high. Add the pancetta and cook until just crisp and lightly browned. Remove with a slotted spoon, leaving the fat in the pan, and set aside. Add the onions to the pan and cook until translucent and slightly browned. Remove with a slotted spoon, leaving the fat in the pan, and set aside. If needed, add more olive oil to pan so you have about 2 tbsp.

Season chicken cutlets with salt&pepper and dredge in flour. Working in batches, brown the cutlets on both sides until cooked through. Remove chicken from pan and set aside.

Pour off the excess fat and add the Marsala wine to the pan. Scrape brown bits from the bottom and cook until wine is reduced by a quarter. Stir in the cream and boil until sauce thickens. Add chicken, pancetta, and onions back to the pan and heat through, 1-2 minutes.

Sprinkle with chopped parsley and serve.

Thursday, January 26, 2012

Modern Whimsy Nursery


    This is the most fun I've ever had decorating a room. I'm sure the excitement of a new baby had something to do with it, but being able to do something colorful and full of whimsy was a blast. We knew right away the traditional baby blue and pastels wasn't happening. We also didn't really want a theme, but more of a color story.  I decided on a bright orange, lime green, and electric blue. We toned the colors down by painting the walls a light neutral color and balanced it with dark wood furniture. We did kind of end up with a zoo animal theme, but that wasn't planned. I still think the color is what stands out the most. Every last detail of the nursery was well thought out. I didn't purchase anything that didn't have a specific purpose or place in the room.


    It is very hard to find baby bedding that isn't pastel or have a major theme plastered all over it. I wanted each piece to have a different pattern on it. I seriously thought about spending hundreds of dollars to have it custom made. Then I came across this set at Babies 'R' Us, on clearance, for less than $100. Score!! The convertible crib also came from there.  ( I wish I had cleaned out some of the clutter around the crib before snapping pictures.)

    This is the crib now, without the bumpers, mattress lowered. The mural on the wall was painted by my stepfather. I wanted something very simple with no shading, as if it had been torn out of a coloring book. It turned out exactly as I had imagined! It is a great focal point in the room. The giraffe in the corner is Henry. Brian's stepmother gave him to us. He started out in her nursery when she was a child, then her sister's, then her niece's, and now he is Ethan's little mascot. The sign hanging off his ear was a gift from a client. She hand painted it to say "Shhhh Ethan is sleeping". These three elements are so special to us because they required so much thought and time from people we love.


    We striped the far wall in the room using the color from the other 3 walls and a lighter shade that we used to paint the ceiling. The glider was given to us from my Aunt. She covered it in the cow print when my cousin was a baby to match his cowboy room. I threw a pillow from Urban Outfitters on it. The shades came from Budget Blinds and they are AWESOME! The chocolate curtains are room darkening and a must since the sun comes up on that side of the house.


   My father-in-law built this toy chest. My husband stained it and I made the cushion for it. We found the wooden letters at Michael's. We stained them the same color as the chest then wiped them so they'd be a little lighter. The 'H' looks lighter than the rest in this picture, but it isn't.


    The changing table it made from an antique secretary that belonged to my mother. We gutted the top portion of it, stained it to match the crib, and put more modern hardware on it. Now the fold down desk holds a changing pad and there is plenty of room in the cubby to hold diapers, wipes, etc. 
 
    We painted the shelves above the changing station the same color we used on the ceiling and striped wall. I painted each of the letters from Michael's the colors used in the room.  The owl lamp came from Urban Outfitters. If you've never shopped there, they have really fun and different stuff to decorate with, on top of cool clothing and accessories. Check it out!


   Finally, my favorite part of Ethan's nursery! We have very small closets in our house so I knew we were going to need lots more storage for all of those little things babies accumulate. I didn't really want another chest or dresser in the room. I wanted something different that allowed easy access to burp clothes, blankets, and bibs. When I was little, my brother had some shelves that fit all of his toys in little cubbies that seemed to fit each toy perfectly, like they were cut to the size of specific toys. I was always so jealous of those shelves. He finally gave them to me when I was a teenager, but they ended up being too big to keep when I moved into my first place of my own.
   So, I designed my own more modern version for Ethan's room. My husband then drew it out and built the shelves for me!  He built them out of high quality birch and trimmed the edges with poplar. They are immaculate! I bought colored storage baskets to hold Ethan's things and filled in with books, shoes, pictures and more. These shelves will last forever and Ethan will be able to display all of his toys on it as he grows.

Ethan playing in his room. (6 months)

Monday, January 23, 2012

Tacos with Chipotle Ranch and Corn Salsa


       These are not your average tacos. They are clean, fresh, and so very simple. I can't wait to make them in the summer when all of the vegetables are even tastier. They start with the typical seasoned ground beef (chicken would be delicious too) and shredded cheese, but they are topped with creamy avacado, fresh corn salsa and a smoky chipotle ranch dressing. I used Boston lettuce leaves to save some extra calories, but I'm sure it would be delicous wrapped in a warm flour tortilla. The homeade Chipotle Ranch starts out with a recipe I've been using lately from Jason and Shawnda but I added canned chipotle peppers to give it a nice smoky flavor. I made the ranch and the corn salsa during Ethan's nap so it would have a couple of hours for the flavors to meld. You don't have to make it ahead, but it's way tastier if you do :)


Tacos with Chipotle Ranch and Corn Salsa


For the Ranch:
3/4 cup mayonnaise
3/4 cup sour cream
1 Tbsp olive oil
1 Tbsp lemon juice
1/4 to 1/2 cup buttermilk
1 small bunch of chives
Small handful of parsley
1 clove garlic
1/2 tsp salt
1/4 tsp white pepper
2-3 chipotle peppers

Place all ingredients in a blender, using less buttermilk for dip and more for dressing. (I used about 1/3 cup) Blend until smooth.
Store in air-tight jar for a week or more in the fridge.


For the salsa:
2 ears yellow corn
2 jalapenos, seeded and chopped
1/2 large bell pepper, chopped
1 small tomato, seeded and chopped
3 green onions, whites and greens chopped
juice of one lime
salt to taste

Wrap corn in paper towels and microwave about 7 minutes; let cool. Scrape kernals into a bowl and add remaining ingredients; stir to combine.
Refrigerate at least 2 hours.


For the tacos:
1lb ground beef
3/4 cup water
taco seasoning
    1  tsp chili powder
    1  tsp onion powder
    1/2  tsp cumin
    1/2  tsp paprika
    1/4 tsp garlic powder
    1/4 tsp seasoning salt
    1/8 tsp cayenne
    1/8 tsp white pepper

Combine spices in a small bowl. Brown beef in skillet until cooked through. Drain if nessecsary. Return to pan with seasonings and water. Cook until most of the water has evaporated.

 Layer lettuce leaves or tortillas with ground beef, shredded cheese, corn salsa, chipotle ranch, and avacado. Enjoy!


Sunday, January 22, 2012

Salvaged Wood Crosses


     Over the years, Brian and I have sort of become pickers. We go to estate sales, yard sales, even pick things up on the side of the road. We have piles of salvaged wood and tons of old furniture begging for a face lift. Brian is very talented and can build pretty much anything out of wood. (He built me a pallet coffee table for Christmas that I will be posting soon.) Sometimes I get tired of only being the design eye and want to get my hands dirty. This is the perfect project for us to do together. We have made these wooden crosses on a couple of different occasions and plan to again in the future.


   We have a trash can full of old trim and crown molding that we have collected over time. Brian's dad has given us a lot of scraps left over from various jobs and we bought a room full of scrap wood at an estate sale recently.


    These are very simple to make. We picked through the old trim and paired up pieces that we liked. We decided the various sizes and angles we wanted to use and Brian cut them to size. We then painted them using different colors and techniques. We painted some solid, some whitewashed, etc. After they dried, we sanded some of the edges so they would look distressed and old.


    The final step was to to go through all of the old hardware we have collected and choose what we wanted to use for each cross. Some of them were easier to attach than others.


     The possibilities are really endless with this project. We have made key holders, coat hooks, and used old jewelry. I also think it would be fun to paint them bold colors or modge podge fun papers or photos onto the wood. I love doing projects that have so many possibilities to be creative!

Friday, January 20, 2012

Rosemary-Balsamic Butternut Squash


   It's been a few days since my last post. Lots of things have been going on around here! I started working on a lot of crafts for Ethan's 1st birthday party coming up in March.  After spending about three hours working on it the first night, I felt very accomplished to have started a few things and even completely finished one project! I was so proud of how great it looked, I took a few pictures to show the girls at work. I left everything on my craft table when I went to bed, knowing I would pick it back up the next night. In the morning, Ethan got up and we followed our normal routine; bottle for him, coffee for me. I went to turn on Good Morning America and....wait, did I mention Ethan is going through this stage where he likes to shake and rock things? Yeah, well, my craft table with my cup of coffee sitting on it was his latest victim. Needless to say, I had to start over on my one beautiful finished project!  At least I have pictures to remember the original.
    That was only the beginning to my week.  It has been crazy busy at work, Ethan is cutting yet another tooth and oh yeah, he started walking! I foresee all of my weeks in the future being just as busy and exhausting as this one. Pray for me and my sanity now that my little climbing, rocking, banging, wild child can get around on two feet!
  Through all this, I did find some time to cook. I have made this butternut squash recipe from Kalyn's Kitchen several times now. It has become a regular side dish in our house. Every time I make it, it seems better than the last. This time, I served it with grilled pork tenderloin and grilled asparagus. Yummm!


  Rosemary-Balsamic Butternut Squash

2 lbs. butternut squash cubes (one large squash)
2 Tbsp olive oil
1 Tbsp + 1 tsp. balsamic vinegar
1 tsp. finely chopped fresh rosemary
salt and pepper to taste

Preheat oven to 400 degrees. Toss squash cubes with olive oil, 1 Tbsp vinegar, rosemary, and salt&pepper. Arrange on baking sheet in a single layer. Roast for 20 minutes, turn and roast about 20 more minutes.
Remove from oven and toss with additional vinegar ans salt&pepper.

(note: As with most dishes, I have never measured any of these ingredients. These are the measurements she gives in her recipe)


   For the pork tenderloin, I used some of the same flavors. The night before, I made a marinade with balsamic vinegar, chopped rosemary, garlic, crushed red pepper, and olive oil. I poked holes all over the tenderloin so the marinade could really sink in and marinated it overnight. I took it out of the fridge when Brian started the grill so it could come to room temp before cooking. He grilled it for about 30-40 minutes.


Monday, January 16, 2012

Eggplant Ricotta Stacks with Sun-dried Tomato Pesto


    I love that my husband is an adventurous eater. He will try anything and likes almost everything. Which is great for me because I love to cook new and interesting dishes. The only two things I can never get away with are eggplant and vegetarian meals. This dish is both of those. I had planned this dish for tonight because Brian wasn't supposed to be home. But his plans fell through and I didn't have any meat thawed out to prepare a different meal. He decided to give it a try and go pick something else up later if he needed to. He didn't need to. He liked it so much, he got seconds. I'm not saying he likes eggplant now and he definitely won't be a vegetarian anytime soon, but at least now I can get my eggplant fix without having to wait for a night when he's out.

    This dish is a spin on eggplant Parmesan. I breaded my eggplant in panko and baked it in the oven until it was nice and golden brown. I layered the eggplant with homemade sun dried tomato pesto, ricotta cheese, and tomato sauce. Then sprinkled some Parmesan cheese on top and baked it in the oven. So delicious! You can use store bought pesto, but it's very easy to make your own and SO much tastier! You can find my pesto recipe at the end of this post.


1 lrg eggplant
2 eggs, lightly beaten
1 1/2 cups panko bread crumbs
1 Tbsp Italian seasoning, divided
1 cup part skim ricotta cheese
1/2 cup sun-dried tomato pesto
1/2 cup shredded Parmesan cheese
3/4 cup tomato basil sauce
cooking spray
salt and pepper


Preheat oven to 400 degrees and spray a foil-lined baking sheet with cooking spray.

Peel eggplant and slice into 1/2 inch rounds ( you will need a total of 12 rounds to make 4 stacks)
Combine panko with  2 tsp Italian seasoning and salt and pepper. Dredge eggplant slices in egg then panko and lay on baking sheet. Spray the tops of the eggplant and bake for 15 minutes. Turn eggplant and cook for 15 more minutes.

Reduce heat to 350 degrees.

Combine ricotta cheese with 1/4 cup Parmesan cheese, 1tsp Italian seasoning, and salt and pepper.

Cover bottom of a casserole dish with 1/2 cup tomato sauce. Lay out four eggplant slices and top each one with about 2 tbsp ricotta mixture and 1 tbsp pesto. Add another layer of eggplant, ricotta, pesto, and finish with a final eggplant slice on each stack. Top each one with more tomato sauce and a sprinkle of Parmesan cheese.  Bake at 350 for 20-25 minutes or until heated through.


Basil Pesto

1 1/2 cups basil
1/4 cup pine nuts
2 cloves garlic
1/4 cup butter, softened
1/4 cup olive oil
1/2 cup Parmesan cheese
salt and pepper

Place all ingredients in food processor or blender. Process until pureed.

Makes about 1 1/2 cups

To make sun-dried tomato pesto simply add 1/4 cup jarred sun dried tomatoes and blend.


Sunday, January 15, 2012

Creamy Ranch Pork Chili


I love making soups and stews this time of year.  I make some sort of soup almost every week during the winter. It is so nice to have something warm and comforting on a cold winter night. It also doesn't hurt that most are a cinch to prepare. This week, I thought soup would be a great way to use the leftovers from the other night when I made slow roasted pork shoulder. This recipe is kind of a cross between chili and brunswick stew, but it's creamy like a chowder. The original recipe is made in a slow cooker, but I cooked mine in a big pot on the stove. That's just my preference. If you prefer to use a slow cooker just skip the onion and garlic step, throw everything else in your slow cooker, and cook on low 6-8 hours.


Creamy Ranch Pork Chili
 adapted from Plain Chicken


1/2 onion, chopped
2-3 cloves garlic. minced
1 can black beans, drained and rinsed
1 can corn, undrained
1 can Rotel, undrained
1 package ranch dressing mix
1 tsp cumin
1 Tbsp chili powder
1 tsp onion powder
1 8 oz package light cream cheese
3/4 cup chicken broth
1lb pork shoulder, shredded


Heat olive oil in a large pot over med/high heat. Add onion and garlic to pan and saute until translucent. Add remaining ingredients, except cream cheese, and stir to combine. Place cream cheese on top. Lower heat, cover, and simmer for 20-25 minutes. Stir cream cheese into chili and serve.


Saturday, January 14, 2012

DIY coasters


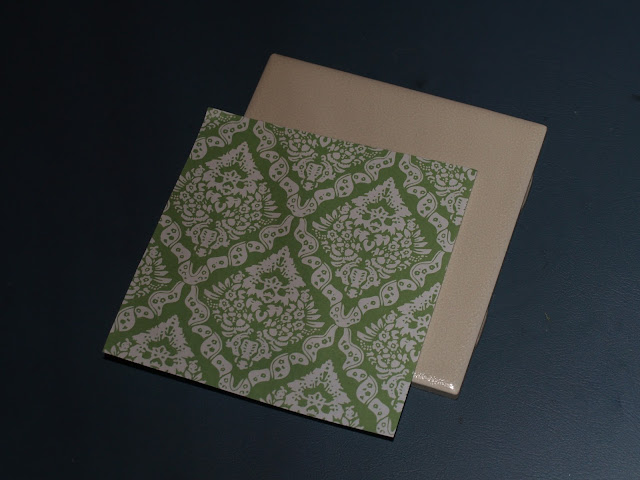
Every Christmas, I make tons of gifts for our family and friends. We still buy a few gifts, but making most of them by hand allows us to give more presents to our loved ones. Plus, handmade gifts make people feel special in a way storebought ones can't. I started seeing DIY coasters on Pinterest  months ago and had been dying to make some. They are easy to make and don't require a lot of materials. When Brian and I came across a huge box of 4in tiles at an estate sale I knew I would be making these babies for Christmas presents. Here's what you need:


4in square tiles
scrapbook paper
decoupage glue
foam brush
clear glaze
felt, cut into small squares
craft glue


Measure your tile and cut the scrapbook paper a little bit smaller than the tile. My tiles were 4 1/4 inches, so I cut the paper to 4 inches.


Brush decoupage glue onto your tile. Cover the tile with a nice thick, even coat. Then center your paper square on the tile. Gently smooth the paper from the center out to the edges. Work pretty quickly because it will dry fast!


 Brush another coat on top of the paper, in one direction, and let dry. Repeat. I did a total of three coats letting each coat dry about 10 minutes before applying the next.


Let tiles dry overnight. Take your tiles outside and lay them on a clean surface. Spray them with the clear glaze. (You may have to do a couple of coats of the glaze, just make sure it fully dries between coats.) Dry overnight.


The last step is to apply the felt squares to the bottom of the tile with a heavy duty craft glue. (Sorry, no picture here. I just bought a stiff piece of felt, cut it into small squares and glued one onto each corner.) Make sure you let this step DRY COMPLETELY before you stack your coasters or they will stick together! ....I speak from experience.

I probably made 20 sets of coasters.  I spent 4 evenings working on this project, doing one step each night. It was fun, inexpensive, and everyone LOVES their coasters!


You can find the tutorial I used here.


Thursday, January 12, 2012

Roasted Broccoli with Parmesan


This is the best broccoli you will ever eat. People who don't like broccoli, like this broccoli. I swear, just try it. I made this one time when my vegetable hating brother-in-law had dinner with us. He didn't want to try it, but I made him. He ate every bite. The next day, my mother-in-law called asking for the recipe "that made Tyler eat broccoli". Yes, it's that delicious. I think I got this from Food Network Magazine , but I can't be sure because I clip out tons of recipes and put them in my own book.


Roasted Broccoli with Parmesan


head of broccoli, chopped
garlic, sliced
parmesan cheese
panko breadcrumbs

Preheat a foil-lined baking sheet in a 450 degree oven. Blanch the broccoli and garlic; drain.

Toss the broccoli and garlic with olive oil, salt and pepper, parmesan cheese, and panko. Arrange on baking sheet and cover with more cheese and breadcrumbs.

Roast until browned, about 15 minutes.


Simple, easy, and tasty! (even for non-vegetable lovers!)


Slow Roasted Pork Shoulder


    We love, love, LOVE  pork shoulder (or Boston Butt) in this house. Brian always makes a dry rub for it and smokes it for hours on the smoker, basting it with homeade bar-b-que sauce. We serve it for a big group of family and friends with my famous white sauce. It is sooo good! That's why I was intrigued when I saw this recipe from NomNomPaleo for Slow Roasted Pork Shoulder. Roasting it in the oven with only vegetables and a simple rub, allowed the flavors of the pork to really come through and gave me the ability to serve it however I wanted. I served this with corn on the cob with herb butter and Roasted Broccoli with Parmesan. This dish made enough for two dinners in our family, so I will be using the leftovers for another meal.


Slow Roasted Pork Shoulder
(adapted from NomNomPaleo)

3lb boneless shoulder roast (boston butt)
dry rub of your choice (I just grab whatever looks good from my cabinet)
vegetables (I had onion, carrot, and garlic on hand)


The night before, season pork with your dry rub. Really work it in, showing it some love. Refrigerate overnight.

In the morning, preheat your oven to 275 and let your pork come to room temperature. Cover a pan with foil and place your veggies on the foil with the roast on top of them. Wrap the veggies and roast in the foil. Put it in the oven and forget about it for at least 6 or 7 hours. ( I checked mine at this point with a meat thermometer and it was close to being done, so I unwrapped it and roasted it about another hour.) Your roast is done when it reaches 165 degrees and is fork tender. Yummm!

When it's done, pull it out of the oven and let it rest while you prepare the rest of your meal, at least 30 minutes. Then, pull it apart with your fingers or two forks.

You could use bbq sauce..or ranch...or whatever tickles your fancy. But it really doesn't need anything. We ate it plain.


I wanted simple sides to go with my simple roast. I wrapped corn on the cob in paper towels and microwaved them for 8 minutes. I chopped up some fresh herbs and stirred them into melted butter to brush over the top of the cooked corn.


We also had Roasted Broccoli with Parmesan which you can find here.


Voila!! Simple and delicious!

Wednesday, January 11, 2012

Pizza Stuffed Portobellos


    I am still lugging around some unwanted baby weight. I am not one of those people who doesn't have to try and is just magically skinny again a few months later. It's genetics....and maybe my inability to put my fork down or pass the cupcake truck. My New Year's resolution is to lose the rest of this baby weight. Well, not really, because I don't do New Year's resolutions and I'm not going on a diet. I have an everyday resolution to be more healthy. Basically, I'm going to eat more fruits and vegetables, less sugar and junk, and drink more water. I know from experience that diets don't work. It's stressful and you usually either give up or gain the weight back. So that's why I decided to just focus on being healthier and the rest will follow.
   I had to do an overhaul on my dinner rotation. No more cheese covered calorie-laden casseroles and fried yummy goodness. I love stuffed mushrooms but wanted to make them into an entree instead of an appetizer. Brian loves pizza. Enter: Pizza stuffed Portobellos. These are gooey, satisfying, and much healthier than pizza. They are also versatile. Maybe next time I'll make mexican stuffed portobellos.


Pizza Stuffed Portobellos

4 portobello mushrooms
1/2 onion , chopped
1/2 green bell pepper, chopped
1-2 cloves garlic,minced
3oz. cream cheese ( I used less fat kind)
bunch of pepperoni , quartered
pizza sauce
mozzarella cheese
parmesan cheese
crushed red pepper
salt and pepper, to taste

Preheat oven to 375 degrees

Prepare mushrooms; Wipe clean, remove gills and stems

Saute onion and peppers in olive oil, until soft. Add garlic and saute another minute.
Combine veggie mixture with cream cheese and pepperoni. Add red pepper, salt, and pepper to taste

Spoon a little pizza sauce in bottom of mushroom, then veggie mixture, a little more sauce, then top with mozzarella and parmesan cheese.

Bake for 15-20 minutes, then broil for about 5 minutes until cheese is melted.

Tuesday, January 10, 2012

Bathroom Remodel

We recently remodeled our bathroom. We probably wouldn't have done it if we didn't have to, but I'm so glad we did! It was hideous! There was a foundation problem under that part of the house and my handyman husband had to jack the house up where it was sinking. Luckily, it completely ruined the bathroom! The tile cracked and the tub separated from the wall. So a couple of weeks later we demolished it and started from scratch. Ethan and I went to stay at my dad's and my father-in-law and brother-in-law came over to help Brian tear everything down and put in a new floor and walls. After all the boring stuff was over, I came back to help out with the tiling, painting and finishing touches! It turned out so awesome! Here are the before, during, and after pictures:


Before: ugly!


 After demolition (our dog Maggie under the house)


 This is when I showed up :)


 Master Tiler!


 After: Beautiful!!


 New tub/shower
 with built in shelf

Mirror on drawer tracks for 'hidden' medicine cabinet

Collage of black and white newborn pictures