Wednesday, December 26, 2012

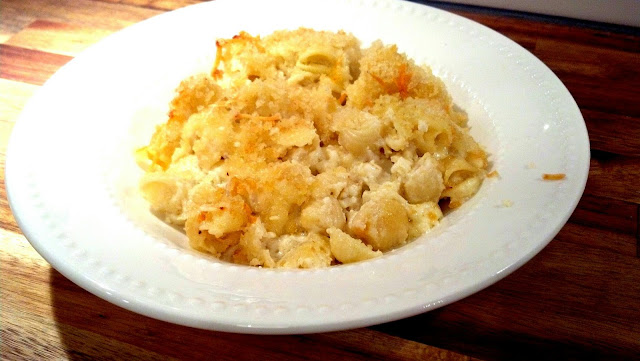
Absolutely, Fabulously Famous Macaroni & Cheese


If there is one dish I'm known for, this is it! It is my required dish for all family get-togethers. I'm not sure they'd even let me through the front door if I didn't have it in my hands. Whenever I make it, no matter where I take it, someone asks for the recipe. So here I am, sharing it with the world!
      Now I will warn you, this is NOT cheap! It is NOT healthy! It is NOT quick and easy! But it is definitely worth it! Make this for a crowd on a special occasion. And expect to be forced into making it for all future special occasions. It is that good!


Kristin's Famous Macaroni & Cheese
(severely adaped from Emeril
 
1lb small pasta shells
1 stick butter, plus 1 Tbsp, plus 2 Tbsp
1/2 cup all purpose flour
4 cups half and half
3/4 tsp salt
1/2 tsp white pepper
Pinch of nutmeg
2-3 cloves garlic (finely grated)
4oz shredded gruyère cheese
4oz shredded sharp cheddar cheese
4oz shredded creamy havarti cheese
8oz shredded parmesan cheese
1/2 cup(or more) panko breadcrumbs
 
Preheat oven to 350 degrees
Boil pasta in large pot of salted water, until cooked through.
 
Meanwhile, melt 1 stick of butter in a saucepan over low heat. Add flour and stir to combine. Cook for a couple of minutes, being careful not to burn. Slowly add half and half, stirring constantly until fully incorporated and there are no lumps. Continue cooking sauce until thickened just enough to coat the back of a spoon. Season with salt, white pepper, and a pinch of nutmeg.
Add about 3/4 of the parmesan and stir until cheese is melted. Remove cheese sauce from heat.
 
  When pasta is done, drain and stir in one tablespoon butter and the garlic. Add cheese sauce to pasta and stir until combined.
  In a separate bowl, combine shredded cheddar, gruyere, and havarti cheeses.
Spray a deep 9x13 casserole dish with cooking spray. Put about one third of the pasta in bottom of dish and layer with one third of the shredded cheeses. Repeat twice, so that you have 3 layers of pasta and cheese, ending with cheese.
 
  In a small bowl, melt 2 tablespoons butter and stir in panko and remaining parmesan cheese. Sprinkle evenly over top of casserole.
  Bake macaroni & cheese, at 350 degrees, for about 25 minutes until top is lightly browned and bubbly.
 
 
Enjoy immensely!


Tuesday, December 25, 2012

Overnight French Toast Casserole

  
  I made Overnight French Toast this year for us to eat on Christmas Eve and Christmas morning. I knew we would be leaving early to visit family on both days, but still wanted to make something special for my boys to eat for breakfast. This was the perfect choice because I was able to throw it together in less than 10 minutes the night before and just throw it in the oven in the morning. It was nice to have a hot breakfast without interfering with my other cooking or family time. This dish would also be fantastic to serve overnight company or maybe even for dessert!
 
 
Overnight French Toast Casserole
(Adapted from The Pioneer Woman)
 
For the French toast:
1 loaf sourdough bread( torn into 1 inch pieces)
8 eggs
2 cups milk
1/2 cup heavy cream
3/4 cup sugar
2 Tbsp vanilla extract
 
For the topping:
1/2 cup flour
1/2 cup brown sugar
1 tsp cinnamon
1/4 tsp salt
1 stick cold butter, cut into pieces
1/2 cup chopped pecans
 
To assemble: Spray 8x11 casserole dish with cooking spray and evenly distribute bread chunks in pan. Mix together eggs, milk, cream, sugar and vanilla. Pour evenly over bread and cover with foil. Refrigerate overnight.
To prepare topping: Mix flour, sugar,cinnamon, salt and pecans in a bowl. Cut butter into mixture until it resembles pebbles. Store in Ziploc bag in the fridge.
In the morning, pour topping evenly over the casserole and bake at 350 degrees for about an hour. Top each serving with syrup.
 
Enjoy!

Monday, December 3, 2012

Silhouette Art


 I have loved silhouettes for as long as I can remember. I find them to be simplistic, yet beautiful. In the past, they were mostly seen in cameos or Victorian designs. But lately, they are all over the place. I have been seeing a lot of silhouette artwork people have done of their children on Pinterest lately, and decided it would be the perfect project to finish a gallery wall I have  been working on in the corner of our living room. So here is what I did, step by step.
  My first job was to get profile pictures of Ethan, Joey, and Max.  I knew it would be challenging considering my subjects were a toddler, a dog, and a cat. So I kept my phone handy all day in anticipation of catching them in the perfect position. I got a decent picture of Joey pretty easily, but I had to draw in her tail and ear later because they weren't visible in the picture. Brian had to hold Ethan in place, so I had to crop out Brian's hand later also.


  Once I had the pictures of all three, I edited them to the size I needed for my canvases. The canvas I used for Ethan's silhouette was 11x13 so I sized it to fit almost the entire sheet of paper. For the animals I used canvases that were 6x8 so I sized them to 5x7 when I printed them out. I found that if I converted the pictures to sketch form and darkened them, the edges were easier to see.
  After printing out the photos, I very carefully cut around the edges. This is the point where I added missing tails and cropped out extra hands. I knew that I would be tracing  and cutting these a second time so I was very clear and sharp with the edges.


   Next, I traced around the images onto vinyl paper. I found this in the scrapbooking section of the craft store. It is black vinyl paper with a sticky side that you can peel off , creating a sticker. After tracing, I cut the images out again. It is very easy to lose detail through all of the tracing and cutting. That is why I was very careful to make defined edges, especially around the face and other distinct features.
     I then painted each canvas the color I wanted the silhouette itself to be and applied the stickers I made onto the canvas.

 
  The only thing  left to do was paint over the entire canvas in the colors I wanted as the background. I applied several coats of paint to each canvas then peeled off the stickers to unveil my creations. I was very pleased with the way they turned out. There were a few places that bled slightly around the edges, but it was easy enough to touch up with a small paint brush.  I think they turned out great!


   I love how even though there is no detail, only a shape, you can still tell exactly who these silhouettes are of. I plan to do one of Ethan every year to see how he changes as he grows. Don't you just love his curls?

   The best part is what a great addition they are to my gallery wall. I think they were the perfect thing to finish it off.


Sunday, December 2, 2012

Caramel Pumpkin Gingersnap Cheesecake


  This cheesecake is perfectly delicious. I first made this recipe, from  The Pioneer Woman, about 3 years ago. I had never made cheesecake before and felt a little intimidated by it, but I love everything pumpkin and anything cheesecake so I decided to give it a try. I have made this exact recipe every year since. It has become a Christmas tradition in our house. This year I decided to make it for a Christmas party I hosted last night for my girlfriends. It was a 'Favorite Things' themed party and it was a blast. But more on that later, this post is all about this fabulously creamy and rich cheesecake.
    Don't be intimidated by cheesecake like I was. It is actually quite easy. But there are a few tips that I've learned that will help in baking the most perfect, moist cheesecake possible. First, make sure all of your ingredients are at room temperature before you begin. (I usually put all of the ingredients out on the counter about 2 hours prior to mixing.) Second, don't over mix your batter.
Third, after the cheesecake is done baking; turn off the oven, open the door a little, and leave the cheesecake in the oven to cool down slowly. This allows the cheesecake to finish cooking and seal in moisture without cracking. I leave it in the oven for about 45 minutes to an hour before putting it in the fridge to chill. There are many other tricks people will tell you, but these seem to work well for me.


 Caramel Pumpkin Gingersnap Cheesecake
  
For the crust:
12 ounces gingersnaps
1/2 cup chopped pecans
6 Tablespoons butter, melted
2 Tablespoons brown sugar
1 dash salt
 

For the filling:
4 (8oz) packages cream cheese
1-1/2 cup sugar
1 can 15-ounce pumpkin puree (NOT Pumpkin Pie Filling)
1 teaspoon ground cinnamon
1 teaspoon allspice
1/2 teaspoon nutmeg
4 whole eggs
2 Tablespoons heavy cream

Extras:
1 jar (12oz) caramel topping
 extra chopped pecans
 extra crushed gingersnaps

Preheat oven to 350 degrees.

For the crust:
Crush gingersnaps in a food processor. Add chopped pecans, melted butter, brown sugar, and salt, and mix until thoroughly combined. Press into bottom and sides of a 10-inch spring form pan. Chill for 20-30 minutes, while you prepare the filling.


For the filling:
In a mixing bowl, beat cream cheese and sugar until light and fluffy. Add pumpkin and spices and mix again. Add eggs one at a time, mixing for 20 seconds between each addition. Add cream and mix until just combined.

Assembly:
Remove thecrust from fridge. Pour 1/2 jar of caramel topping on crust. Sprinkle caramel with chopped pecans. Pour cheesecake filling into pan. Even out the top with a spatula.

Place in oven and bake at 350F for 1 hour 15 minutes, until jiggly but not soupy. (You will think it isn't done, but resist temptation to cook it longer.) Follow tip #3 by turning off the oven and opening the door. Leave the cheesecake in the oven to cool down for about 45 minutes or longer.
Once cooled, pour remaining caramel over the top and smooth with spatula.
Cover cheesecake and chill in the refridgerator for 4 hours or overnight.

When ready to serve, remove from pan and top cheesecake with extra chopped pecans and crushed gingersnaps.
 
Enjoy!