Thursday, March 29, 2012

Rustic 1st Birthday Photo Shoot


     I am so excited to finally be able to share the results of Ethan's 1st Birthday photo shoot! Everything turned out perfect and I couldn't be happier with the outcome. I spent hours planning his photo shoot, trying to figure out exactly how I wanted it and collecting everything I needed for props. I knew from the beginning it would be in a rustic setting with Ethan wearing his overalls, sans shirt and shoes. I was surfing Pinterest  for inspiration, when I came across this adorable smash cake session from On To Baby. I immediately fell in love with it and knew I would be making a boy version for Ethan's photos.

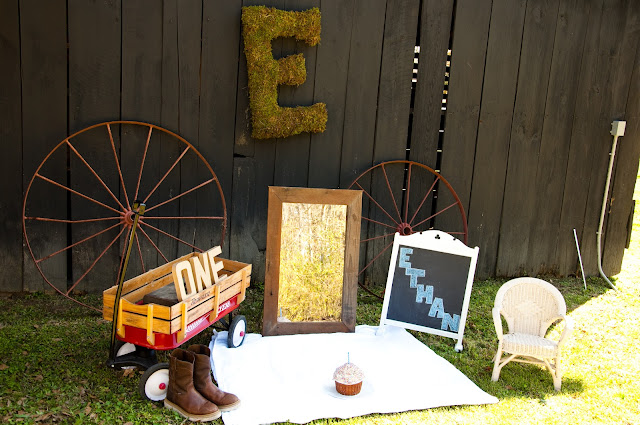
      I have a friend whose family owns a wedding venue in Odenville, Alabama. There is a fantastic old barn on the property complete with old wagon wheels and bales of hay. It was the perfect spot for our pictures and my friend's Mom was kind enough to let us use it. Once I had the location, I started collecting my props. I used the chalkboard I painted a few weeks ago to write Ethan's name on and found an old wicker chair at my grandmother's house. I went to the local flea mall and found a great deal on an old Radio Flyer wagon. I bought some cardboard letters, spelling "ONE" at the craft store to put inside the wagon. I really loved the idea of the mirror, so I had my handyman/husband build me a rustic frame and tarnish it with our homemade stain. Brian's work boots were the perfect finishing touch.


   As far as the cake went, I HAD to have a giant cupcake! I bought a silicone pan that makes a cake 25x the size of a regular cupcake. I used boxed cake mix and a tub of icing and covered it with TONS of sprinkles! It looked perfect and it was so much fun to watch Ethan tear into it.


    One of my favorite details of the pictures is the giant moss-covered E. It was not part of my original plan. But, when we pulled up to the barn, the 'E' was hanging from a window. It turns out, my friend had gotten married there the day before and her new last name begins with an E. They had simply forgotten to take it down when they cleaned up after the reception. How great is that? It was the perfect accompaniment to Ethan's pictures.


    We used anything and everything we found laying around the barn. There was an old wash bin, hay bales, and 2 huge wagon wheels. Ethan is a ham in front of the camera and he had a ball walking around and playing. He carried his favorite wrench around with him almost the whole time. (He already gravitates towards tools and is very interested in how they work. Like father, like son.)

Monday, March 19, 2012

Sour Cream Noodle Bake


         I came across the recipe for Sour Cream Noodle Bake on Pinterest. It originally came from The Pioneer Woman, so you know it's good! She uses cottage cheese in her recipe, but I absolutely HATE cottage cheese so I used cream cheese instead. It turned out wonderfully and I've made it a few times. The recipe calls for 8oz of egg noodles, but I have only been able to find 12oz packages. Don't make the mistake I did and use the whole package anyway. Try to get as close to 8oz as possible because it will not be as yummy and creamy otherwise! This dish is so delicious and easy to throw together on a busy weeknight. I served it with garlic bread.


Sour Cream Noodle Bake
(adapted from The Pioneer Woman )

1 1/4lbs ground beef
1 15oz can tomato sauce
salt &pepper
8 ounces, weight egg noodles
1/2 cup sour cream
1 pkg cream cheese, softened
1/2 cup sliced green onions (less to taste)
1 1/2 cup grated sharp cheddar cheese


Preheat oven to 350 degrees.
Brown ground beef in a large skillet. Drain fat, then add tomato sauce, salt, and plenty of freshly ground black pepper. Stir, then simmer while you prepare the other ingredients.
Cook egg noodles. Drain and set aside.
In a medium bowl, combine sour cream and cream cheese. Add plenty of freshly ground black pepper. Add to noodles and stir. Add green onions and stir.
To assemble, add half of the noodles to a baking dish. Top with half the meat mixture, then sprinkle on half the grated cheddar. Repeat with noodles, meat, then a final layer of cheese. Bake for 20-25 minutes, or until all cheese is melted.


Enjoy!


Posted by on March 16 2011


Thursday, March 8, 2012

The Best Baked Chicken Fingers You'll EVER eat!

 
       I have made these chicken fingers twice in the last two weeks. That NEVER happens! Most dishes never make a repeat appearance, and if they do, it is several weeks later. This is looking like a weekly meal for us. Brian just can't get enough of these and I don't mind because they are such a healthy version of chicken fingers.
        I have tried to make baked chicken fingers a few times and have never been happy with the results. They just never seem to get crispy enough. But these chicken fingers, from Sweet Pea's Kitchen, are the exception. They are super crispy and light; and they aren't the least bit greasy. The trick is to toast the panko in a pan before crusting the chicken. That way they are nice and crispy before they even hit the oven. GENIUS! They are also quick and easy to prepare, which makes them the perfect weeknight meal. So please, make these tomorrow....and the next day...and the day after that......


Crispy Baked Chicken Fingers
(from Sweet Pea's Kitchen )


2 cups panko breadcrumbs
2 tablespoons canola oil
1/2 cup all-purpose flour
1 teaspoon garlic powder
1/8 teaspoon cayenne pepper
3 large egg whites
1 tablespoon water
1 tablespoon Dijon mustard
1/4 teaspoon dried thyme
1 1/2 lb chicken tenderloins (or boneless, skinless breasts cut into 3/4-inch strips)

Preheat oven to 475 degrees and set a wire rack on a rimmed baking sheet; spray with cooking spray.
Combine canola oil and breadcrumbs in a skillet and cook over med-high heat, stirring constantly, until browned. Remove from heat and let cool.
In a shallow dish, combine flour, cayenne, and garlic powder.
In another shallow dish, combine egg whites, water, thyme, and Dijon mustard. Whisk until eggs are broken up and mixture is foamy.
Season chicken with salt &pepper. Dredge each piece in flour, then the egg whites, and finally the toasted panko; coating evenly. Place on wire rack making sure not to crowd them to close together.
Spray chicken lightly with cooking spray and bake 10-12 minutes until cooked through.
Serve with your favorite dipping sauce.
Enjoy!

Monday, March 5, 2012

Italian Meatloaf with Balsamic Glaze


     There are very few dishes I make time and time again.  I usually change recipes each time I make them. Sometimes, I only make small changes, and sometimes I change it up completely. But, I only make one kind of meatloaf. It's just that good. I probably like this meatloaf so much because of the Italian flavors, but it is also moist and delicious. Nothing is worse than dry, hard, bland meatloaf. Gross! This is none of those things. It's so flavorful and it literally falls apart on your plate. It was hard to get an actual 'slice' of meatloaf for the pictures. MMMmmm!
     I got this recipe out of my favorite cookbook, The Best of Cooking Light. Surprisingly, I follow the recipe almost exactly. The only thing I change is the topping. They use plain ketchup and ,of course, that just doesn't work for me. So, I decided to add a balsamic glaze and some cayenne pepper to the ketchup. Perfect! I served this with mashed potatoes and roasted carrots.


Italian Meatloaf with Balsamic Glaze
 Adapted from Cooking Light

1 cup boiling water
1/2 cup sun-dried tomatoes
1/2 cup ketchup
1 cup breadcrumbs (of course I use panko)
3/4 cup chopped onion
3/4 cup chopped basil
1/2 cup shredded provolone
2 large egg whites
2 cloves garlic, minced (I use more :)
1lb ground beef
cooking spray
1/3 cup ketchup
3 Tbsp balsamic glaze
pinch cayenne pepper

Combine boiling water and tomatoes in a bowl, let stand about 30 minutes until soft. Drain and chop.
Preheat oven to 350 degrees.
Combine tomatoes, 1/2 cup ketchup and next 7 ingredients. Shape into a loaf and place on a baking sheet coated with cooking spray.
Stir together 1/3 cup ketchup, balsamic glaze, and cayenne pepper. Spread over top of meatloaf.
Bake at 350 degrees for 1 hour or until temperature reaches 160 degrees. Let stand 10 minutes before slicing.


Enjoy!!