Wednesday, December 26, 2012

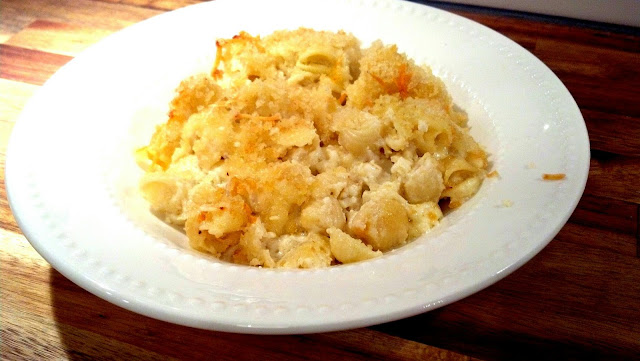
Absolutely, Fabulously Famous Macaroni & Cheese


If there is one dish I'm known for, this is it! It is my required dish for all family get-togethers. I'm not sure they'd even let me through the front door if I didn't have it in my hands. Whenever I make it, no matter where I take it, someone asks for the recipe. So here I am, sharing it with the world!
      Now I will warn you, this is NOT cheap! It is NOT healthy! It is NOT quick and easy! But it is definitely worth it! Make this for a crowd on a special occasion. And expect to be forced into making it for all future special occasions. It is that good!


Kristin's Famous Macaroni & Cheese
(severely adaped from Emeril
 
1lb small pasta shells
1 stick butter, plus 1 Tbsp, plus 2 Tbsp
1/2 cup all purpose flour
4 cups half and half
3/4 tsp salt
1/2 tsp white pepper
Pinch of nutmeg
2-3 cloves garlic (finely grated)
4oz shredded gruyère cheese
4oz shredded sharp cheddar cheese
4oz shredded creamy havarti cheese
8oz shredded parmesan cheese
1/2 cup(or more) panko breadcrumbs
 
Preheat oven to 350 degrees
Boil pasta in large pot of salted water, until cooked through.
 
Meanwhile, melt 1 stick of butter in a saucepan over low heat. Add flour and stir to combine. Cook for a couple of minutes, being careful not to burn. Slowly add half and half, stirring constantly until fully incorporated and there are no lumps. Continue cooking sauce until thickened just enough to coat the back of a spoon. Season with salt, white pepper, and a pinch of nutmeg.
Add about 3/4 of the parmesan and stir until cheese is melted. Remove cheese sauce from heat.
 
  When pasta is done, drain and stir in one tablespoon butter and the garlic. Add cheese sauce to pasta and stir until combined.
  In a separate bowl, combine shredded cheddar, gruyere, and havarti cheeses.
Spray a deep 9x13 casserole dish with cooking spray. Put about one third of the pasta in bottom of dish and layer with one third of the shredded cheeses. Repeat twice, so that you have 3 layers of pasta and cheese, ending with cheese.
 
  In a small bowl, melt 2 tablespoons butter and stir in panko and remaining parmesan cheese. Sprinkle evenly over top of casserole.
  Bake macaroni & cheese, at 350 degrees, for about 25 minutes until top is lightly browned and bubbly.
 
 
Enjoy immensely!


Tuesday, December 25, 2012

Overnight French Toast Casserole

  
  I made Overnight French Toast this year for us to eat on Christmas Eve and Christmas morning. I knew we would be leaving early to visit family on both days, but still wanted to make something special for my boys to eat for breakfast. This was the perfect choice because I was able to throw it together in less than 10 minutes the night before and just throw it in the oven in the morning. It was nice to have a hot breakfast without interfering with my other cooking or family time. This dish would also be fantastic to serve overnight company or maybe even for dessert!
 
 
Overnight French Toast Casserole
(Adapted from The Pioneer Woman)
 
For the French toast:
1 loaf sourdough bread( torn into 1 inch pieces)
8 eggs
2 cups milk
1/2 cup heavy cream
3/4 cup sugar
2 Tbsp vanilla extract
 
For the topping:
1/2 cup flour
1/2 cup brown sugar
1 tsp cinnamon
1/4 tsp salt
1 stick cold butter, cut into pieces
1/2 cup chopped pecans
 
To assemble: Spray 8x11 casserole dish with cooking spray and evenly distribute bread chunks in pan. Mix together eggs, milk, cream, sugar and vanilla. Pour evenly over bread and cover with foil. Refrigerate overnight.
To prepare topping: Mix flour, sugar,cinnamon, salt and pecans in a bowl. Cut butter into mixture until it resembles pebbles. Store in Ziploc bag in the fridge.
In the morning, pour topping evenly over the casserole and bake at 350 degrees for about an hour. Top each serving with syrup.
 
Enjoy!

Monday, December 3, 2012

Silhouette Art


 I have loved silhouettes for as long as I can remember. I find them to be simplistic, yet beautiful. In the past, they were mostly seen in cameos or Victorian designs. But lately, they are all over the place. I have been seeing a lot of silhouette artwork people have done of their children on Pinterest lately, and decided it would be the perfect project to finish a gallery wall I have  been working on in the corner of our living room. So here is what I did, step by step.
  My first job was to get profile pictures of Ethan, Joey, and Max.  I knew it would be challenging considering my subjects were a toddler, a dog, and a cat. So I kept my phone handy all day in anticipation of catching them in the perfect position. I got a decent picture of Joey pretty easily, but I had to draw in her tail and ear later because they weren't visible in the picture. Brian had to hold Ethan in place, so I had to crop out Brian's hand later also.


  Once I had the pictures of all three, I edited them to the size I needed for my canvases. The canvas I used for Ethan's silhouette was 11x13 so I sized it to fit almost the entire sheet of paper. For the animals I used canvases that were 6x8 so I sized them to 5x7 when I printed them out. I found that if I converted the pictures to sketch form and darkened them, the edges were easier to see.
  After printing out the photos, I very carefully cut around the edges. This is the point where I added missing tails and cropped out extra hands. I knew that I would be tracing  and cutting these a second time so I was very clear and sharp with the edges.


   Next, I traced around the images onto vinyl paper. I found this in the scrapbooking section of the craft store. It is black vinyl paper with a sticky side that you can peel off , creating a sticker. After tracing, I cut the images out again. It is very easy to lose detail through all of the tracing and cutting. That is why I was very careful to make defined edges, especially around the face and other distinct features.
     I then painted each canvas the color I wanted the silhouette itself to be and applied the stickers I made onto the canvas.

 
  The only thing  left to do was paint over the entire canvas in the colors I wanted as the background. I applied several coats of paint to each canvas then peeled off the stickers to unveil my creations. I was very pleased with the way they turned out. There were a few places that bled slightly around the edges, but it was easy enough to touch up with a small paint brush.  I think they turned out great!


   I love how even though there is no detail, only a shape, you can still tell exactly who these silhouettes are of. I plan to do one of Ethan every year to see how he changes as he grows. Don't you just love his curls?

   The best part is what a great addition they are to my gallery wall. I think they were the perfect thing to finish it off.


Sunday, December 2, 2012

Caramel Pumpkin Gingersnap Cheesecake


  This cheesecake is perfectly delicious. I first made this recipe, from  The Pioneer Woman, about 3 years ago. I had never made cheesecake before and felt a little intimidated by it, but I love everything pumpkin and anything cheesecake so I decided to give it a try. I have made this exact recipe every year since. It has become a Christmas tradition in our house. This year I decided to make it for a Christmas party I hosted last night for my girlfriends. It was a 'Favorite Things' themed party and it was a blast. But more on that later, this post is all about this fabulously creamy and rich cheesecake.
    Don't be intimidated by cheesecake like I was. It is actually quite easy. But there are a few tips that I've learned that will help in baking the most perfect, moist cheesecake possible. First, make sure all of your ingredients are at room temperature before you begin. (I usually put all of the ingredients out on the counter about 2 hours prior to mixing.) Second, don't over mix your batter.
Third, after the cheesecake is done baking; turn off the oven, open the door a little, and leave the cheesecake in the oven to cool down slowly. This allows the cheesecake to finish cooking and seal in moisture without cracking. I leave it in the oven for about 45 minutes to an hour before putting it in the fridge to chill. There are many other tricks people will tell you, but these seem to work well for me.


 Caramel Pumpkin Gingersnap Cheesecake
  
For the crust:
12 ounces gingersnaps
1/2 cup chopped pecans
6 Tablespoons butter, melted
2 Tablespoons brown sugar
1 dash salt
 

For the filling:
4 (8oz) packages cream cheese
1-1/2 cup sugar
1 can 15-ounce pumpkin puree (NOT Pumpkin Pie Filling)
1 teaspoon ground cinnamon
1 teaspoon allspice
1/2 teaspoon nutmeg
4 whole eggs
2 Tablespoons heavy cream

Extras:
1 jar (12oz) caramel topping
 extra chopped pecans
 extra crushed gingersnaps

Preheat oven to 350 degrees.

For the crust:
Crush gingersnaps in a food processor. Add chopped pecans, melted butter, brown sugar, and salt, and mix until thoroughly combined. Press into bottom and sides of a 10-inch spring form pan. Chill for 20-30 minutes, while you prepare the filling.


For the filling:
In a mixing bowl, beat cream cheese and sugar until light and fluffy. Add pumpkin and spices and mix again. Add eggs one at a time, mixing for 20 seconds between each addition. Add cream and mix until just combined.

Assembly:
Remove thecrust from fridge. Pour 1/2 jar of caramel topping on crust. Sprinkle caramel with chopped pecans. Pour cheesecake filling into pan. Even out the top with a spatula.

Place in oven and bake at 350F for 1 hour 15 minutes, until jiggly but not soupy. (You will think it isn't done, but resist temptation to cook it longer.) Follow tip #3 by turning off the oven and opening the door. Leave the cheesecake in the oven to cool down for about 45 minutes or longer.
Once cooled, pour remaining caramel over the top and smooth with spatula.
Cover cheesecake and chill in the refridgerator for 4 hours or overnight.

When ready to serve, remove from pan and top cheesecake with extra chopped pecans and crushed gingersnaps.
 
Enjoy!

Monday, November 26, 2012

I'm Baaack!!....and White Chicken Enchiladas

  
  I have not been paying proper attention to my blog. We have been so busy lately and it has been the last thing on my mind. We have remodeled about 85% of our home over the past few months (in some way or another) and I finally feel like I can breathe again. We still aren't completely finished, but we are getting there!
   So what have we done? The biggest thing was a complete kitchen remodel. We changed EVERYTHING!! We saved the floors for last because we ran them throughout the entire house. We also painted our living room and hallway and got a new sofa, curtains, rugs, and accessories. We also changed my beloved dressing room into an office. This required moving Brian's clothes from the bedroom to the new 'office' and all of my clothes from the old 'dressing room' into the master bedroom. I also bought all new bedding for our bedroom and hung some new artwork throughout the house. As you can imagine, all of this was DIY and included many, many craft projects. I will have so many things to show you and hopefully I can get back into a good rhythm with my blog posts.
   As for today's post,  dinner was White Chicken Enchiladas. I have made these a couple of times and they are very good. I changed the original recipe by using diced jalapenos instead of green chilies and added cumin and garlic powder to the cream sauce. Using a rotisserie chicken made it really easy and the perfect weeknight meal.


Chicken Enchiladas with Jalapeno Sour Cream Sauce
( adapted from Joyful Momma's Kitchen)
   
10 soft taco shells
2 cups cooked chicken (I used rotisserie)
2 cups shredded Monterrey Jack cheese
3 Tbsp butter
3 Tbsp flour
2 cups chicken broth
1 cup sour cream
1 (4 oz) can diced jalapenos (or green chilies)
1 tsp cumin
1/2 tsp garlic powder


Preheat oven to 350 degrees. Grease a 9x13 pan. Mix chicken with one cup cheese and roll up in tortillas. Place, seam side down, in pan.
In a saucepan, melt butter then stir in flour and cook for about 1 minute. Add broth in a slow stream while whisking, until smooth. Heat over medium heat until thick and bubbly.
Turn down heat and stir in spices, sour cream, and chilies. Be careful not to boil the mixture, it will curdle!
Pour sauce over enchiladas and top with remaining cheese.
Bake 22 min and then under high broil for 3 min to brown the cheese.

Enjoy!


Wednesday, July 4, 2012

Healthy Breakfast Round-up

  We always hear that breakfast is the most important meal of the day. But so many of us don't enjoy eating breakfast  or have a hard time finding something healthy to eat in the morning. Eating a healthy breakfast has been hard for me in the past because it's the one meal of the day that I really don't want to cook or put a lot of effort into. Sure you can get up and prepare a  fresh vegetable frittata or fancy egg white omelet if you want, but I want something quick and easy. Cracking an egg in a skillet to cook for 2 minutes or toasting a bagel is about all you're going to get from me.
   I have been alternating these three breakfasts for the last couple of weeks. I can't eat the same thing everyday because, well, I get bored. But it would be too expensive to buy items for a lot of meals so I just rotate 2-3 breakfasts for a couple of weeks then come up with more ideas to rotate the next time. All three of these have my top priorities for breakfast; they have less than 300 calories and all contain a protein, a healthy carb, and a fruit.

   My number one go to breakfast is Greek yogurt with blueberries and granola. I love it because it's easy, refreshing, and absolutely no cooking is required. This is a pretty typical breakfast of someone who likes to eat healthy. I like the Chobani non-fat vanilla yogurt the best. It seems to have the best consistency of all the Greek yogurt I have tried. I also really like blueberries with my yogurt. They are so nutritious and full of antioxidants. I try to include as many 'superfoods' into my diet as possible. Plus, blueberries are little man's absolute favorite food, so we always have them in our fridge.
   As for the granola, I actually use Kashi GoLean cereal. Granola can be 200 calories or more per serving and is generally full of sugar. I found this at the grocery store while comparing granola and knew I could use it to add crunch to my yogurt while saving about 150 calories! It has only 60 calories per 1/4 cup and is loaded with 18g of whole grains, 8g of fiber, and 9g of protein.


Greek Yogurt with Blueberries and Kashi

1/2 cup nonfat Greek Yogurt
1/2 cup blueberries
1/4 cup Kashi GoLean cereal

Makes 1 serving
200 calories


  Another breakfast I've been eating is a toasted whole grain English muffin with egg whites, turkey, and Babybel cheese served with fruit. This one takes a little more effort so I really only have it once or twice a week.


    I start out by toasting the English muffin in the toaster oven. Then I cook my eggs, weigh the turkey, and shred the cheese. Layer it all on the toasted muffin and broil it until the cheese is melted. It is served with fruit. In this case, fresh watermelon picked from the garden the day before. My husband's Great-Grandfather has a garden with TONS of watermelons and they are to die for!
   I always use 100% whole grain bread products and use egg beaters for convenience. I like this Delifresh turkey because it is only 45 calories per serving (I only use half a serving for this sandwich).These mini Babybel cheeses are awesome! There are a lot of different flavors, all for a nice, portion controlled, 60 calories.

 
Turkey Egg and Cheese Muffin

1 whole grain English Muffin
1/4 cup Egg Beaters
1 oz deli turkey
1 Babybel cheese (I used sharp original)

Makes 1 serving
235 calories (without fruit)


Lastly, a whole wheat bagel thin with either eggs or Laughing Cow cheese served with, you guessed it, fruit. There is nothing fancy or innovative about this breakfast, but I find myself eating it often. It's complete simplicity and with the Laughing Cow cheese it's the perfect on-the-go breakfast. I am obsessed with this cheese. It comes in a million different flavors. Its smooth and creamy. It's perfect on bagels, wraps, sandwiches, crackers or eating straight from the wrapper. And its only 35 calories per wedge for the 'Light' and 45 calories for the regular. I use it almost everyday to make my lunch wrap and Ethan loves it on his quesadillas.


Bagel Thin with Scrambled Eggs/ Laughing Cow Cheese

1 Bagel Thin, toasted
1/4 cup Egg Beaters and/or 1 wedge Laughing Cow Cheese

Makes 1 serving
145 calories (with eggs or cheese)
180 calories ( with eggs and cheese)

*Does not include fruit. I usually have about 1/2 cup of fruit for an additional 50 calories.


   Most morning I will also have one up of coffee with 1Tbsp Natural Bliss Vanilla creamer. I love this stuff. I switched from my favorite Creme Brulee creamer when I decided to start eating as clean as possible. This creamer contains milk, cream, sugar, and vanilla flavoring. No artificial ingredients. I just love being able to pronounce all the ingredients to foods I'm putting into my body. It feels good!


Enjoy!


Thursday, June 21, 2012

DIY Workout Shirt


   A few months ago, I donated everything in my closet that didn't fit me anymore. After gaining a lot of weight during my pregnancy, and not being able to lose it, that amounted to about 90% of my clothing. I had been holding on to some items for years and it felt really good to finally be letting go of it all. It was a cleansing experience and I couldn't have been more proud of myself afterwards for letting go of that excess baggage.
   Boy, do I regret it now! I would have a closet full of clothes that seemed brand new. But instead, I have even less to wear because everything I kept, is falling off of me now. I have bought a few things, but I am trying to keep the shopping at a minimum until I reach my goal weight.
   Which brings me to workout clothes. I threw out every piece of exercise clothing I owned. Obviously, the last time I wore them I was much smaller. Apparently, spandex tanks, yoga pants, and running shorts are not the most forgiving. So when I came across a tutorial on Pinterest for turning an old t-shirt into a workout tank, I knew I had my next project. This works best with a loose fitting tee because it will cinch in a good bit. I made two, but I am enjoying them so much, I plan on making many more and trying more styles. Here's what I did:

1. Start with an old t-shirt.


2. Cut off the sleeves and collar, staying as close to the seam as possible. ( I left the collar on the grey shirt because it was already a deep V)


3. Cut the sleeves and collar a little deeper so that it resembles a tank top. (I used a washable pen to draw out my lines before cutting.)


4.  Use the original collar (or a long strip of fabric) to cinch the back across the shoulders. This will make it look like a racerback tank. Tie a double knot and cut off the excess.


5. Admire your work!


Tuesday, June 19, 2012

Toddler Approved Green Monster Smoothie


 Today for my mid-morning snack I decided to make a green monster smoothie. These smoothies, made using spinach or other leafy greens, are all over the internet lately. I have been wanting to give it a try for a while now. It was REALLY good! I used banana, strawberries, spinach, almond milk, and water to make mine.
   Ethan LOVED this smoothie. After I filled my cup, I poured the rest in a little cup for him and he was all about it! Ethan has always been a great eater, but lately he has been spitting out anything green.  You can't even tell there is spinach in it, so it is a great way to sneak vegetables to a picky toddler, child, or even an adult. Next time, I will make Ethan his own smoothie, so he doesn't insist on drinking mine!

Here is Ethan trying his smoothie.

"WHOA, Mom! That is awesome!"

Here is Ethan after insisting on having my smoothie.
This is the face I got every time I took my smoothie back!


Green Monster Smoothie
Makes one 24oz smoothie (130 calories)

1/2 banana, peeled, sliced, and frozen
1 cup strawberries
a handful (or two) spinach
1/2 cup unsweetened vanilla almond milk
1/4 cup to 1/2 cup water
ice

Place banana, strawberries, almond milk, spinach, and a few cubes of ice in a blender. Blend until well mixed, adding water if needed. *I used a little less than half a cup of water to get the consistency I wanted. Pour and Enjoy!

Notes: This smoothie can be made a million different ways. Try adding peanut butter or Greek yogurt for more protein. Or, try making it using different fruits. You can always use cow's milk, I just prefer unsweetened almond milk because it is lower in calories and sugar.


Monday, June 18, 2012

Weight Loss and Crash Hot Sweet Potatoes

  You may have noticed I haven't made any new blog posts in over a month. I have been on a brief hiatus to focus on my health. I am proud to say after 15 months I am finally at my pre-pregnancy weight! Getting healthy has been quite a journey for me. My weight has yo-yoed for years and I have always struggled to lose weight and keep it off. I lost 30 lbs before getting pregnant, only to gain close to 50 throughout my pregnancy with Ethan. Diabetes and heart disease are serious issues in my family so I knew how important it was for me to start living a healthy lifestyle now, before I started having issues of my own.
   I have begrudgingly tried so many diets and forms of exercise in the past; some worked, some didn't. But I never once enjoyed it enough to turn it into a lifestyle. This time has been different. I am enjoying eating clean, healthy foods and I am loving the way exercising makes me feel. I worked with a weight loss clinic for the first month, doing a complete overhaul of my diet and taking HCG injections to help me along. I drank a gallon of water everyday and lived off of only chicken breast, green veggies, and a handful of fruits. It was tough, but I felt better and better everyday knowing I was becoming healthier and cleaning all of the toxins, from the junk I had been eating the past 26 years, out of my body. Now, I am on my own, but remain eating a low calorie diet made up of lean protein, vegetables, fruit, and whole grains. I love the way real food tastes now. I love feeling satisfied after a small portion without feeling like I'm going to burst because I ate so much food. I love my body again and I love having nothing to wear because all of my clothes are falling off of me!
   Of course, eating nothing but plain chicken and steamed vegetables, I had nothing interesting to add to the blogosphere last month. But fear not, I have started cooking again and look forward to sharing some delicious, healthy recipes with you!


   Tonight for dinner we had a turkey breast tenderloin I rubbed with a salt-free blackening seasoning from a local company, Dak's Bistro. I served it with a green bean salad and Crash hot sweet potatoes. I have made these sweet potatoes several times, I just changed the recipe up a little bit to lower the calories per serving. They weren't really unhealthy before, so I only made a few small changes. You can find the original recipe here .


Crash Hot Sweet Potatoes
Serves 4 (110 calories per serving)

2 small to medium sweet potatoes, peeled
cooking spray
1 Tbsp brown sugar
1 tsp chili powder
1/4 tsp cumin
1/4 tsp ground ginger
1/4 tsp cinnamon
1/8 tsp salt

Preheat oven to 375 degrees.
Cut peeled potatoes about 1- 1 1/2 inches thick. Cook in boiling water for about 10 minutes, until just tender. Drain potatoes and let cool about 10 minutes. Place the potatoes on a baking sheet lightly sprayed with cooking spray. Use a fork to slightly smash each potato disk. Spray tops with cooking spray.
Combine sugar, salt, and spices. Distribute spice  mixture evenly amongst potato slices.
Bake on 375 for about 20 minutes. Broil last few minutes for sugars to caramelize.

In the original recipe, both sides are coated with sugar/spices and a butter/olive oil mixture is used to aid in caramelization. These have much less fat and sugar, but still taste delicious.


Enjoy!

Wednesday, May 9, 2012

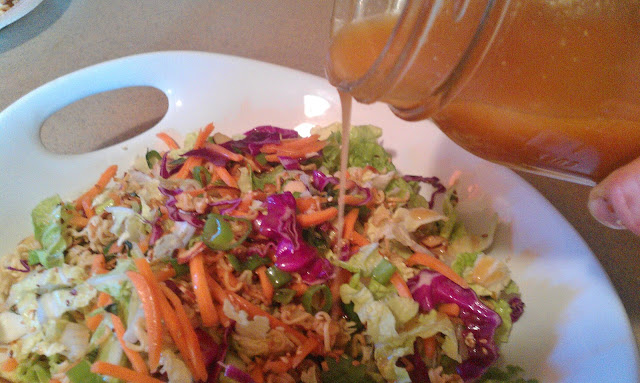
Crunchy Asian Salad with Sesame Encrusted Chicken Fingers


    This week my vegetable box from Purple Pumpkin Produce included a head of napa cabbage and a head of red cabbage. I have never bought napa cabbage and immediately started searching for a recipe to use it in. I found a couple of different recipes for cabbage salad and decided on using this one from Farm Flavor. I have really been on an Asian kick lately so I already had most of the ingredients on hand. I changed it a little bit just to suit my tastes and the ingredients I already had in my kitchen.
   I knew these Sesame Encrusted Chicken Fingers would go perfectly with the salad. I have made them a couple of times and they are delicious. A while back,  I came across a recipe on one of my favorite healthy food blogs, Skinny Taste, and crossed it with my famous  baked chicken fingers.   They are a great spin on the traditional chicken fingers when served with Asian inspired dishes. I am playing around with even more fun twists to put on these chicken fingers. I'm thinking buffalo chicken fingers? Sounds tasty, huh?  Stay tuned for that one.


Crunchy Asian Salad with Sesame Encrusted Chicken Fingers
(chicken fingers adapted from Skinny Taste and my chicken fingers )
(salad adapted from Farm Flavor )

For the chicken fingers:
3 chicken breasts, cut into strips
1 cup panko breadcrumbs
1/2 cup sesame seeds
1 Tbsp canola oil
2 Tbsp sesame oil
2 Tbsp soy sauce

For the salad:
1 head napa cabbage, thinly sliced
1/2 small head red cabbage, thinly sliced
1 cup matchstick carrots
4 scallions, chopped
handful Thai basil and/or cilantro
1 pkg ramen noodles, crushed (do not use spice packet)
1/2 cup slivered almonds
1/4 cup sesame seeds
1 Tbsp butter
1Tbsp sesame oil

For the dressing:
6 Tbsp rice vinegar
4 Tbsp honey
1/2 cup canola oil
1 tsp kosher salt
1 tsp pepper
1 Tbsp soy sauce
1 Tbsp Siracha
1 tsp hot mustard
1/2 tsp hoisin sauce


For the chicken fingers:
Preheat oven to 475 degrees and set a wire rack on a rimmed baking sheet; spray with cooking spray.
Combine the sesame oil and soy sauce in a bowl and marinate the chicken tenders for 15 minutes.
Combine canola oil, sesame seeds and breadcrumbs in a skillet and cook over med-high heat, stirring constantly, until browned. Remove from heat and let cool.
One at a time, remove tenderloins from soy sauce mixture and coat with the panko. Place each tenderloin on prepared baking pan and coat with cooking spray. Bake 10-12 minutes until cooked through.

For the salad:
Combine napa cabbage, red cabbage, carrots, scallions, and herbs in a large bowl.
Melt butter and sesame oil in a medium skillet. Saute ramen noodles, almonds, and sesame seeds until toasted. Remove from heat and let cool.
Combine all ingredients for the dressing in a mason jar and shake until well combined.

To serve:
Toss vegetables, noodle mixture, and dressing in a bowl and top with chicken fingers.

Enjoy!